About Fontaine Tech
Fontaine Tech builds AI-powered tools designed for real business workflows.
Our focus is simple: make artificial intelligence useful inside everyday business operations. Instead of offering generic AI chat tools or simple generation wrappers, we build structured systems that businesses can safely deploy directly on their websites.
Fontaine Tech provides AI assistants that interact with your customers, answer questions, guide them through your services, and help them understand what your business offers.
Behind the scenes, our platform gives you visibility into those interactions. You can see what your customers are asking for, where they are getting stuck, and what they care about most. This turns everyday conversations into practical insight that helps you improve your product, refine your messaging, and serve customers more effectively.
Our dashboards are designed to be simple and operational. Businesses can monitor conversations, review common issues, and identify patterns without needing technical expertise or complex analytics tools.
Fontaine Tech is built for entrepreneurs and teams who want to use AI to improve efficiency without introducing unnecessary complexity or risk.
Use Cases
Fontaine Tech is designed to work on any publicly accessible website.
Implementation is straightforward: once installed, the AI assistant can immediately begin helping visitors interact with your business.
Common applications include:
Customer Intake and Onboarding
Guide new users through your services, collect key information, and direct them to the right next step.
Lead Qualification
Answer early questions, identify high-intent prospects, and help potential clients understand whether your product is a good fit.
Customer Support
Resolve common support questions automatically while surfacing more complex issues for review.
Product and Service Guidance
Help users navigate your website, understand your offerings, and find the tools or services they are looking for.
Operational Impact
By handling these early interactions, Fontaine Tech allows businesses to provide immediate assistance to every visitor while freeing teams to focus on higher-value work.
The Fontaine Tech Web Agent
The web agent is served to your customers through our lightweight widget. You can edit the widget's behavior and style using the Web Agent Control Panel to update how it is presented to your website's users.
Setup is straightforward: configure your agent, preview changes instantly, and launch without rebuilding your website. Most businesses can tailor responses, tone, and visitor flow in minutes.
Once live, the agent can answer questions, guide visitors through your services, capture qualified leads, and support scheduling or intake workflows, all in one place.
How to use the web agent
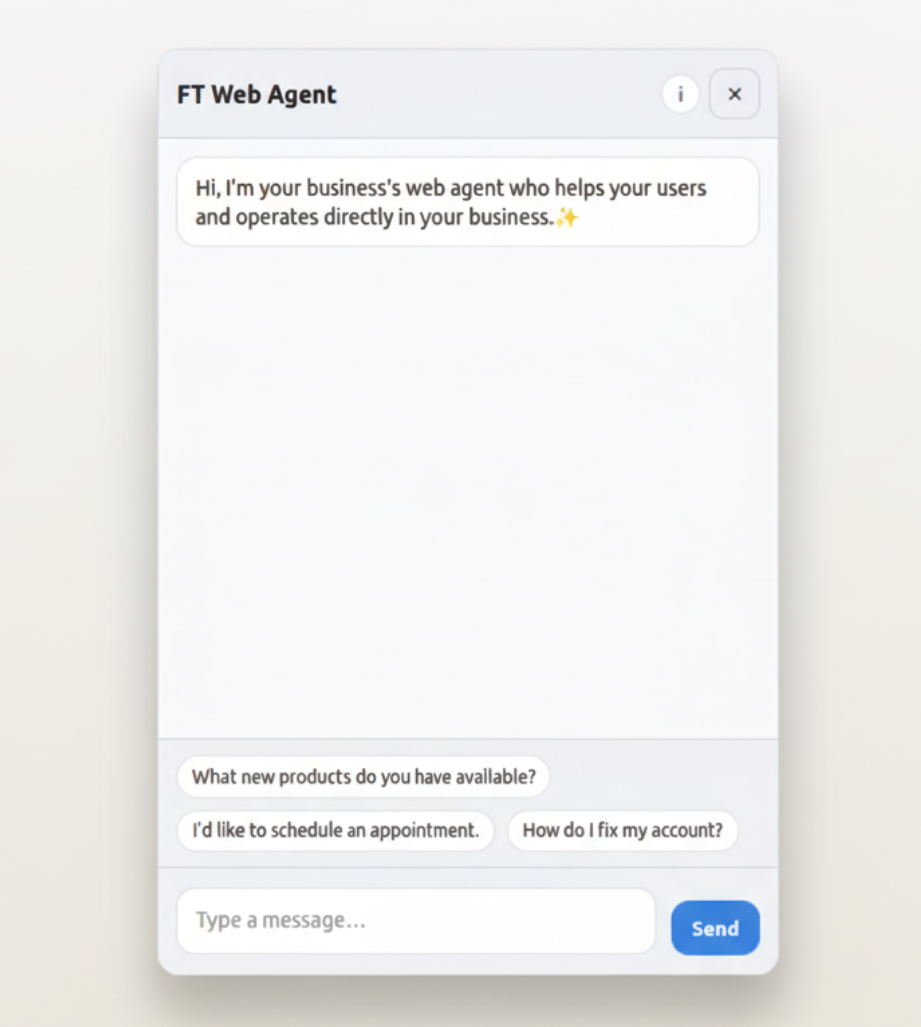
Your web assistant lives on your website in the bottom-right corner of the page. The icon color can be customized in the Web Agent Control Panel and appears on every page where your agent is embedded.
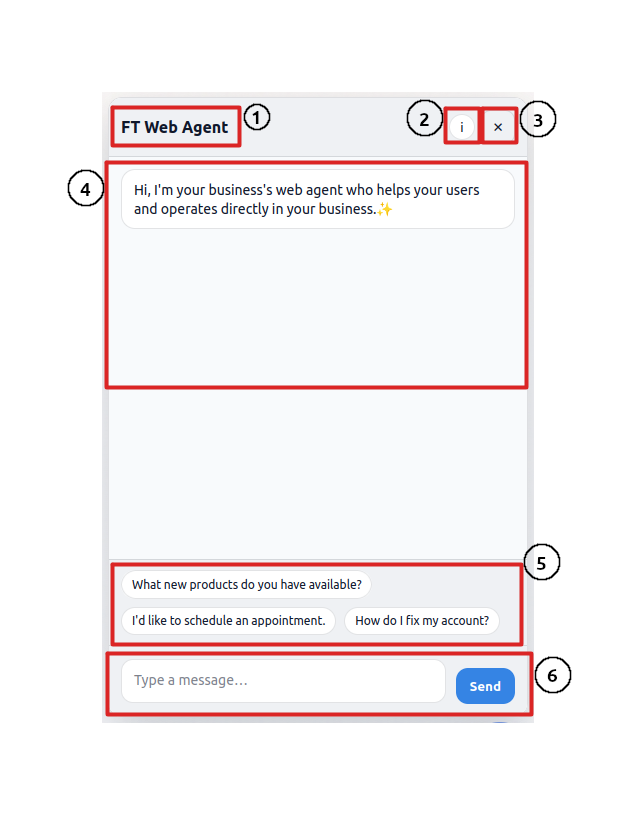
Using the agent is simple. The numbered key on each image matches the explanations below so you can quickly map each UI element to its function.
- 1 - Chat Title: You can select the title for your chat agent to give it a name or custom branding so customers know immediately who they are speaking with.
- 2 - Info Window: Opens a small modal with details about your conversation and options to recover past conversations.
- 3 - Close: Closes the window but maintains the conversation until the page is hard refreshed or the user clears their cache.
- 4 - Message Window: Includes a greeting message that you set, plus the user's conversation history so they can review prior responses.
- 5 - Suggested Messages: Up to three messages you can create to help users start a conversation quickly and discover what they need.
- 6 - Send Message: The input area users use to chat with your agent. The send button color can be customized in the Web Agent Control Panel.
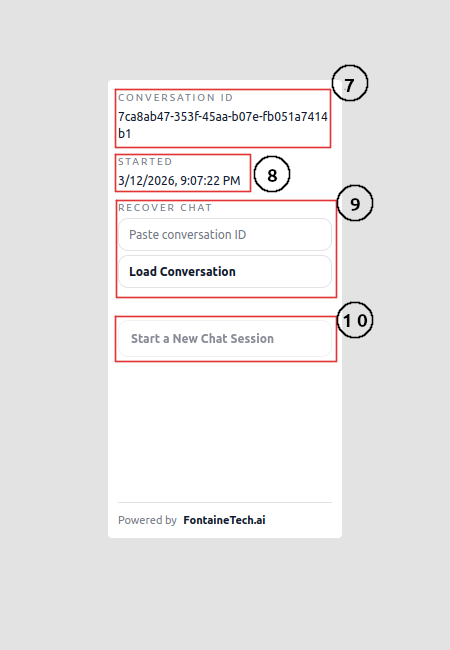
- 7 - Conversation ID: The ID of the user's conversation. It can be used for chat recovery by the user or by your support team to find past queries.
- 8 - Timestamp: The date and time that the user's conversation was started.
- 9 - Chat Recovery: The user can paste a previous conversation ID into the recovery window. If that conversation exists on your domain, they can continue where they left off.
- 10 - Start a New Chat Session: Starts a brand-new chat session in case the user wants fresh context or to clear occasional queueing issues.
Web Agent Features
Your web agent can be configured to support several types of customer interactions. Many of these capabilities can be enabled or adjusted independently in the Web Agent Control Panel. Visitors can chat in plain language, and the agent uses conversation context plus your configuration to decide which tools and responses to use.
Knowledge-based question answering: The agent can be trained on your business information to answer detailed customer questions accurately and consistently.
Real-time customer guidance: Visitors can ask questions about your products or services and get immediate, practical answers at any time.
Lead capture: The agent can engage new visitors, gather key details, and help match them to the most relevant offers.
Lead prioritization: The agent can identify high-intent opportunities so your team can focus follow-up efforts where they matter most.
Operational intake: You can configure intake flows so the agent collects the information needed before your team steps in.
Appointment scheduling and follow-ups: The agent can propose meeting times, collect contact details, and schedule discussions through the chat flow.
Support ticket creation: The agent can create structured tickets automatically when a customer issue requires follow-up.
Human escalation rules: You can define when conversations should be escalated to a human, such as critical issues or frustrated users.
Conversation summaries: The agent can generate concise summaries so your team can review outcomes quickly without reading full transcripts.
Conversation recovery: Users can resume previous conversations using a conversation ID when they return.
Feedback collection: The agent can prompt customers for feedback at key moments in the conversation to help you improve service quality.
The Fontaine Tech Dashboard
The dashboard is your main operations hub. After signing in, open Profile from the site header to access your account settings, configure your web agents, and review customer interactions in one place.
Dashboard Options
The Dashboard brings your core controls into a single workspace so you can manage your AI operations without jumping between tools.
Web Agent Control Panel: Configure your agent's style, behavior, tools, and domain deployment settings.
Agent Conversations: Review conversation logs, summaries, and outcomes to monitor quality and identify follow-up opportunities.
Account Limits: Track domain capacity and interaction usage, then increase limits when needed.
Billing History: Review subscription activity, payment status, and renewal timing.
Google Calendar Settings: Review rollout status for Google Calendar integration and the messaging tied to your current plan.
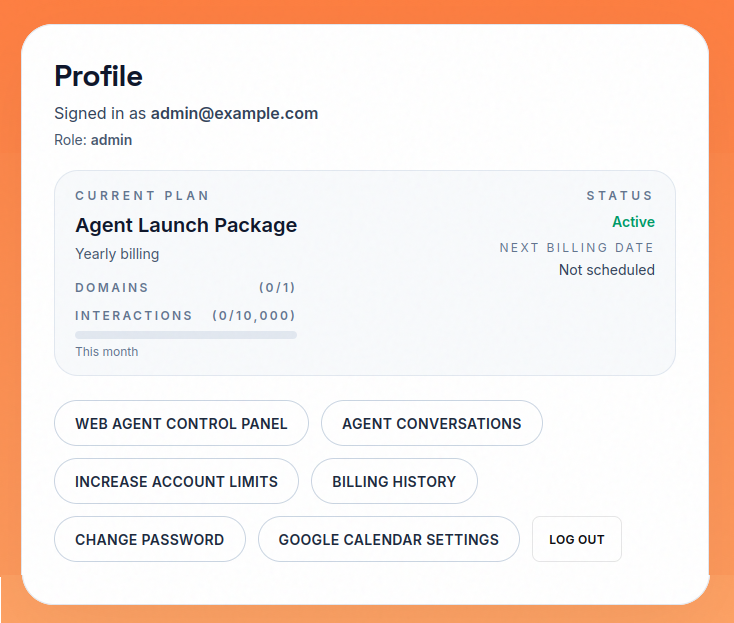
Account Status Window
The Account Status Window gives you a quick operational summary of your plan, usage, and billing timeline. Use the numbered key on the image to reference each area explained below.
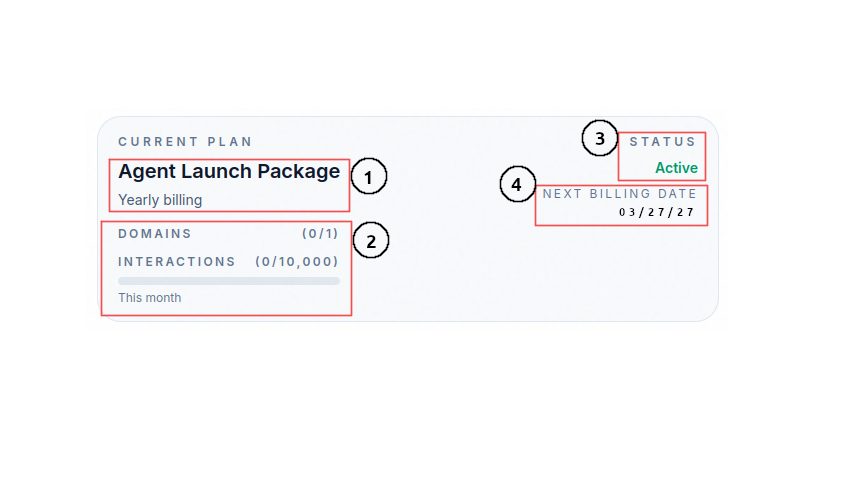
1 - User Plan Selection: This area shows your current tier and billing cadence. Free accounts display no subscription, while Starter, Standard, and Pro accounts display monthly or yearly billing.
2 - Account Limits: This section shows your available domain and interaction limits, including capacity added through upgrades. It also tracks how many interactions have been used during the current period and how many remain.
3 - Account Status: Indicates whether the account is Free, Active, or Inactive. Inactive paid accounts fall back to free-tier limits until the subscription is renewed.
4 - Next Billing Date: Shows when your next charge is scheduled. You can update plans or add-ons at any time before this date.
Web Agent Control Panel

Getting Started
The Web Agent Control Panel is where each domain-specific agent is configured and prepared for deployment.
Domain Setup
To begin, enter your website domain. Selecting a domain unlocks the full Web Agent Settings for that deployment, and each domain on your account can run its own agent configuration.
Verification and Launch
Free accounts can verify one domain and launch a low-volume live widget immediately. Paid tiers unlock higher traffic caps, multiple domains where applicable, and advanced agent tools. If your paid subscription becomes inactive, you can still configure the agent and test in preview while the account runs on free-tier limits until renewal.
Creating a web agent
Creating your agent starts with configuration and testing. Build the behavior first, validate it in preview, then deploy once the output is aligned with your business.
Agent Style Settings
Set the agent's identity and presentation so visitors immediately understand who they are talking to.
Agent Title: Appears in the top-left corner of the chat window so customers can identify the assistant at a glance.
Agent Name: The name the agent uses when referring to itself during conversations.
Company Name: Defines the business the agent represents.
Greeting Message: The first message shown in new chats. Use it to introduce the assistant and guide users on what to ask.
Theme Mode: Switch the chat window between light and dark mode.
Select Accent Color: Sets the key UI color for the modal and send button.
Suggested Prompts: Add up to three short starter prompts users can click to begin quickly.
The Agent Preview Window
Test behavior before deployment. Click Update Preview, interact like a real user, and validate responses to critical questions.
Business Identity
Teach the agent your company's voice, positioning, and story so responses sound informed and brand-aligned.
Personality / Behavior
Control tone, warmth, and response style so the assistant matches your customer experience goals.
How should your agent respond to customers: Provide explicit response guidance, including preferred phrasing and details the agent should consistently include.
Any special behaviors you would like your agent to have: Add specific behavior rules such as asking qualifying questions or directing users toward selected services.
Operational Info
Provide operational details including location, service area, business hours, and contact pathways so answers remain accurate.
Scheduler
Enable appointment workflows and define exactly how meeting requests should be handled.
Meeting Purposes: Define why meetings are booked and set a default duration for each purpose.
Availability: Set scheduling windows so the agent only offers valid meeting times.
Configure Calendar: Connect Google Calendar so booked meetings can be posted and sent as calendar events.
Products / Services
Build a structured catalog so the agent can explain offerings with depth and route users to the right next step.
Type: Set each catalog item as a product or service.
Link: Attach a destination URL so users can view details or purchase directly.
Notes: Add operational context such as known ordering issues or fulfillment details.
Item FAQs: Add item-specific Q&A to improve answer precision for each offering.
Ticket Responses
Enable support ticket intake, set response expectations, and define escalation triggers for human follow-up.
Chat ID workflow: When enabled, the agent prompts users to save their chat ID so your team can reference the conversation during follow-up.
Feedback
Add feedback prompts and control when they appear in the conversation.
General FAQ
Capture business-wide questions and answers not already covered in the setup flow.
Save Agent
Save all settings to your account and generate the embed snippet used to render the agent on your website.
Connect to your website
Once your agent is configured and behaving the way you want in preview, the final step is connecting it to your live website.
To go live, verify your domain from the Web Agent Control Panel. Domain verification confirms ownership and allows your widget deployment to serve customer traffic securely from that domain.
Verification works by adding a TXT DNS record generated by Fontaine Tech to your domain's DNS settings. After the record is published, return to the Web Agent Control Panel and click Verify DNS.
DNS propagation can take up to two hours depending on your DNS provider and TTL settings. If your account includes additional domain capacity, you can repeat this process for each domain.
Embed Snippet
Add this script to your website template where you want the widget available, then deploy your site changes.
<script async src="https://fontainetech.ai/widget/v1/embed.js"></script>DNS Verification Workflow
- Open your Web Agent Control Panel and select the domain you want to deploy.
- Copy the TXT record values generated by Fontaine Tech (record name/host and token value).
- Sign in to your DNS provider and add a new TXT record for that domain.
- Save the record and allow DNS propagation to begin.
- Return to the Web Agent Control Panel and click Verify DNS.
- After verification succeeds, your domain is ready to serve the live agent widget.
TXT Record Fields
Type: Use TXT.
Host / Name: Use the exact host value shown in the control panel. Some providers require @ for the root domain.
Value / Content: Paste the verification token exactly as provided.
TTL: Use default or a low value (for example 300 seconds) for faster propagation during setup.
Provider-Specific Setup
Cloudflare
- Go to DNS > Records.
- Click Add record, select Type = TXT.
- Enter the Name and Content values from Fontaine Tech.
- Set TTL to Auto or 300, then save.
GoDaddy
- Open Domain Portfolio > your domain > DNS.
- Under Records, click Add and choose TXT.
- Set Host and TXT Value using the values from the control panel.
- Set TTL (for example 1 hour or lower if available), then save.
Namecheap
- Open Domain List > Manage > Advanced DNS.
- In Host Records, click Add New Record and choose TXT Record.
- Enter Host and Value from Fontaine Tech.
- Set TTL to Automatic or a low value, then save all changes.
Squarespace Domains (and legacy Google Domains)
- Open Domain Settings > DNS Settings.
- Add a Custom Record with Type = TXT.
- Paste the Host/Name and Value from Fontaine Tech.
- Save changes and wait for propagation.
Agent Conversations
In Agent Conversations, you can review all conversation logs handled by your agent in one workspace. Use this area to monitor inbound leads, evaluate summary quality, track appointments, and identify unresolved issues that may require human follow-up.
Filters
Use filters to narrow what you are reviewing by domain, date range, lead quality, and required summary fields. Filter selection is also applied to Lead Summary Export, so exported files only include conversations currently in scope.
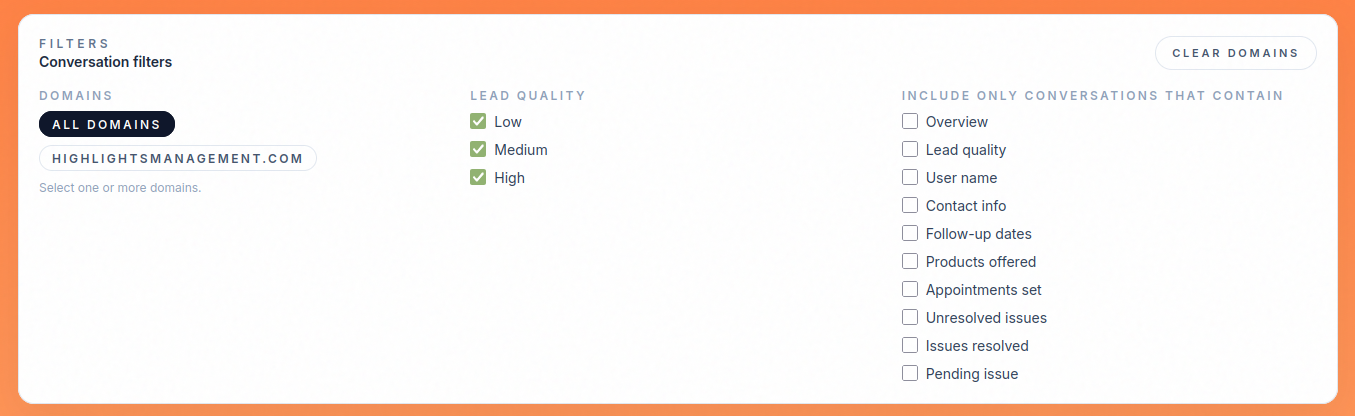
Domain filter: Review conversations from one or multiple selected domains.
Date range filter: Limit results by conversation start date.
Lead quality filter: Focus review on low, medium, or high-quality lead segments.
Required field filters: Return only conversations that contain selected summary attributes such as contact info, follow-up dates, or appointments.
Lead Summary
The conversation detail workspace combines full transcript review with a structured lead summary panel, giving both context and actionable outcomes in one place.
Conversations List
The conversation list shows all sessions that match your active filters.
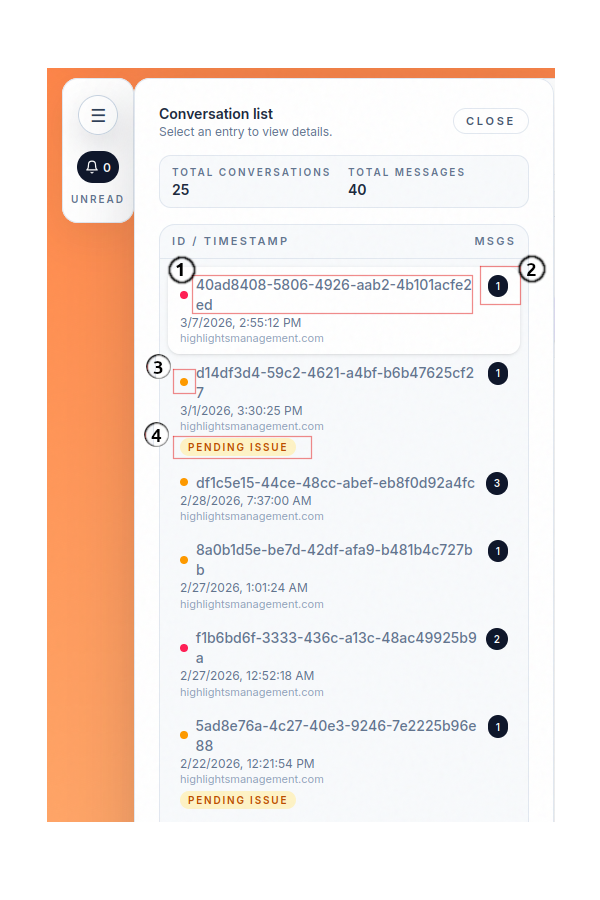
- 1 - Conversation ID: Unique identifier for the customer session. It is used for chat recovery and as a reference when handling follow-up tickets.
- 2 - Message Count: Total number of messages in the conversation.
- 3 - Lead Quality Indicator: Color-coded lead quality signal for quick triage. Red indicates low intent, yellow indicates medium intent, and green indicates high intent.
- 4 - Pending Issue Indicator: Flags unresolved customer issues. These represent open support outcomes and may include captured contact details for follow-up.
Conversation Window
Review the full transcript between the visitor and your agent, including conversation metadata such as ID, timestamp, and total message volume.
Lead Summary
The lead summary panel provides an at-a-glance breakdown of conversation outcomes, including overview, lead quality, appointments, captured contact details, products offered, and issue handling status.
Lead Summary Export
Export lead summaries to .xlsx by selecting the fields you want to include. The export respects active filters, allowing targeted reporting without additional data cleanup.
Account Limits
Account limits define how much live traffic your deployment can support and how many domains can serve an agent at the same time.
There are two core limits on every account: domain capacity and interaction capacity. Domain capacity controls how many domains can be verified and deployed. Interaction capacity controls how many end-user messages your agents can process during each 30-day cycle.
If your account has multiple verified domains, all domains share the same interaction pool.
What are account limits
Your plan sets the baseline limits for your account.
Free: 1 verified domain and 50 interactions per 30-day cycle.
Starter: 1 verified domain and 1,000 interactions per 30-day cycle.
Standard: 1 verified domain and 15,000 interactions per 30-day cycle.
Pro: up to 3 verified domains and 40,000 interactions per 30-day cycle shared across those domains.
Interaction usage is measured as messages sent by your website visitors to your agent. The interaction counter resets every 30 days from your account creation timestamp, not from your billing renewal date.
How to increase account limits
Use the Increase Account Limits page to extend capacity beyond your base paid plan.
Add Domains increases how many domains can be verified on the account.
Add Interactions increases your recurring interaction cap in 10,000-interaction increments.
30-Day Interaction Boost adds a temporary block of 2,000 interactions for 30 days. Boost interactions are consumed only after your recurring interaction pool is exhausted.
Add-ons follow the same billing interval as your paid plan. New recurring add-ons are prorated at checkout for the remaining time in your current billing period, then renew at full price on your next billing date.
Billing History
Billing History is the transaction log for your account. It shows what was purchased, when it was billed, and what will renew next.
Each row represents a specific plan or add-on item, including recurring renewals.
What each billing entry includes
Item name: The specific service or add-on tied to that charge.
Billing date: When the charge was created.
Status: Current Stripe billing state for the item.
Next billing date: Upcoming renewal date for recurring items.
Amount: The amount charged for that line item.
Billing status values
Active: The recurring item is paid and currently in service.
Pending payment: Checkout was created but not yet completed.
Failed payment: The payment attempt did not succeed.
Complete: A one-time charge was paid successfully.
Canceling recurring items
Recurring paid plans and recurring add-ons can be canceled from their line item in Billing History.
Cancellation is scheduled for period end. The item remains active through the paid term, then is removed before the next renewal charge.
Temporary interaction boosts are one-time purchases and are not cancelable after purchase.
Google Calendar Settings
Important note: Google Calendar integration is temporarily unavailable in the dashboard. Free accounts see an upgrade notice, and paid accounts currently see a coming-soon status.
Google Calendar integration is temporarily unavailable in the dashboard while the rollout is paused.
Free accounts see an upgrade message for Google Calendar integration. Paid accounts see a Coming Soon status until the calendar workflow is re-enabled.
When the integration returns, each domain will support its own timezone and calendar ID so appointments can route to the correct calendar per site or business unit.